

HOW TO INSTALL YOUR PERGOLA SYSTEM (CLICKLOC)
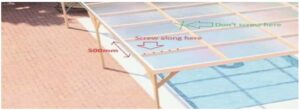
- From your first timber, your second one should be at 485 center then, Space roof
timbers at 500mm centers running the same direction as the pergola sheeting. - Join each sheet directly on top of the timber and screw every 200mm, only fit the
screws in the valley, never screw into the multiwall. - Provide additional bridging pieces between timbers for extra stability.
- Pre-drill all holes with a slightly larger drill bit head, this is for two purposes 1.
To allow for thermal expansion and 2. to prevent you having to use as little
additional force as possible which will help to prevent damaging the head of your
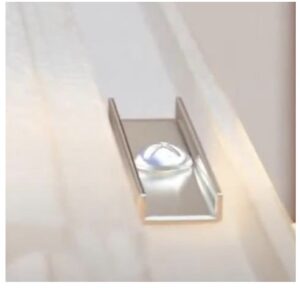
screw, if you burr the head of the screw the next sheet will not interlock. - Only fit screws in the valley (see photo below)
- DO NOT use any silicone/fix-all until the process is complete, afterwards run a
layer of silicone around whole way around where your sheet meets your Uprofiles and compress so that it is all the one sealed unit. - When sealing each sheet with your sealing tape and ventilation tape it is important
NOT to go beyond where your sheets interlock, stop the tape just before the valley
where the next sheet will sit, otherwise this can have big implications with
problems with the next sheet joining easily the way they should. - Leave the protective film on the sheets until you have fitted the entire roof. This
is to help prevent scoring/scrapes of polycarbonate - When screwing down your channel washers to secure your sheet to your
timber/steel DO NOT Over screw , as this may kink the washer, and will lead
to complication’s in joining sheets together. See fixing brochure of example of a
kinked channel washer - Lay your first sheet on and fix, (video link, see next page) , then with the 2nd
sheet as you go to interlock with the other, just before doing so, use a little
lubrication such as warm water, do not use any other type of
lubricant on the valley of fitted sheet, this make interlocking much faster and
easier. - Please note there is only one fixing area on one side only, this side will be firmly
held in place with the F-Profile. The sheets are fixed on one side only .And fix the
screw ONLY in the fitting valley, and NEVER through the 16mm part of the sheet,
this will damage the sheet and cause condensation and leaks in time. For
example, like a double – glazed pane of glass, the double panes must never be
comprised, otherwise condensation will enter and cause condensation, its much
the same situation here with 16mm Multiwall Clickloc Sheet - It is advised to use the 27mm screws with the black washer head along the
exterior of the F-Profile to ensure a classy finish. - U profile’s are a simple pressure fit, no additional mechanical fix is required, and
its advised to use top and bottom , bottom side being the gutter end, top side
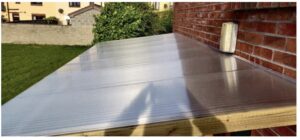
being the direct opposite end. - If your butting against a wall, have the sheet with the U-Profile as tight as
possible against the wall (see picture attached) then layer the All-Purpose
clear silicone to fill any gap between your wall and the fitted U Profile/sheets.
(Please note F Profile `Side profile` is not fitted in this picture it was in the middle
of the process when picture was taken)
- Always fit the sheets with the label side up, as this is the UV protected
side.
• It is advised to use the 27mm screws with the black washer head along the
exterior of the F-Profile to ensure a classy finish. - All our screws & channel washers are stainless steel, & both the F Profile &the U-Profiles
are mill aluminum finish.
Please CLICK following link in your internet tab to watch the fixing process. - https://vimeo.com/469784014/3d0e420e67
